Wow touring the Cavern [Near Peach Springs, Arizona on Old RT 66] was a great side trip. I am sorry we never did it sooner!
If you are intending to camp, or even considering camping, at the Grand Canyon Caverns Campgrounds, or simply passing by on old RT 66. Be sure to allow time for the Cavern Tour!
Did you know you can have your meal down in the Cavern? The combo meal & tour is very reasonably priced. When we looked at the menu and the tour, as individual prices. Having the experience in the cave, was a no brain’er!
Follow the link over to the full article. In the article there are links to other points of interest. Also our experience camping in the campground. Grand Canyon Caverns Article.
Subscribe to our Email List if you haven’t already. Receive our latest Blog Posts and newsletters. They are packed with Interesting & Informative content. Don’t miss out on Upcoming Events.
This is written for venturing into the Havasu Falls area of Arizona, USA. But much of this subject applies to backpacking anywhere. You need to know the specific wildlife of the area you intend to visit.
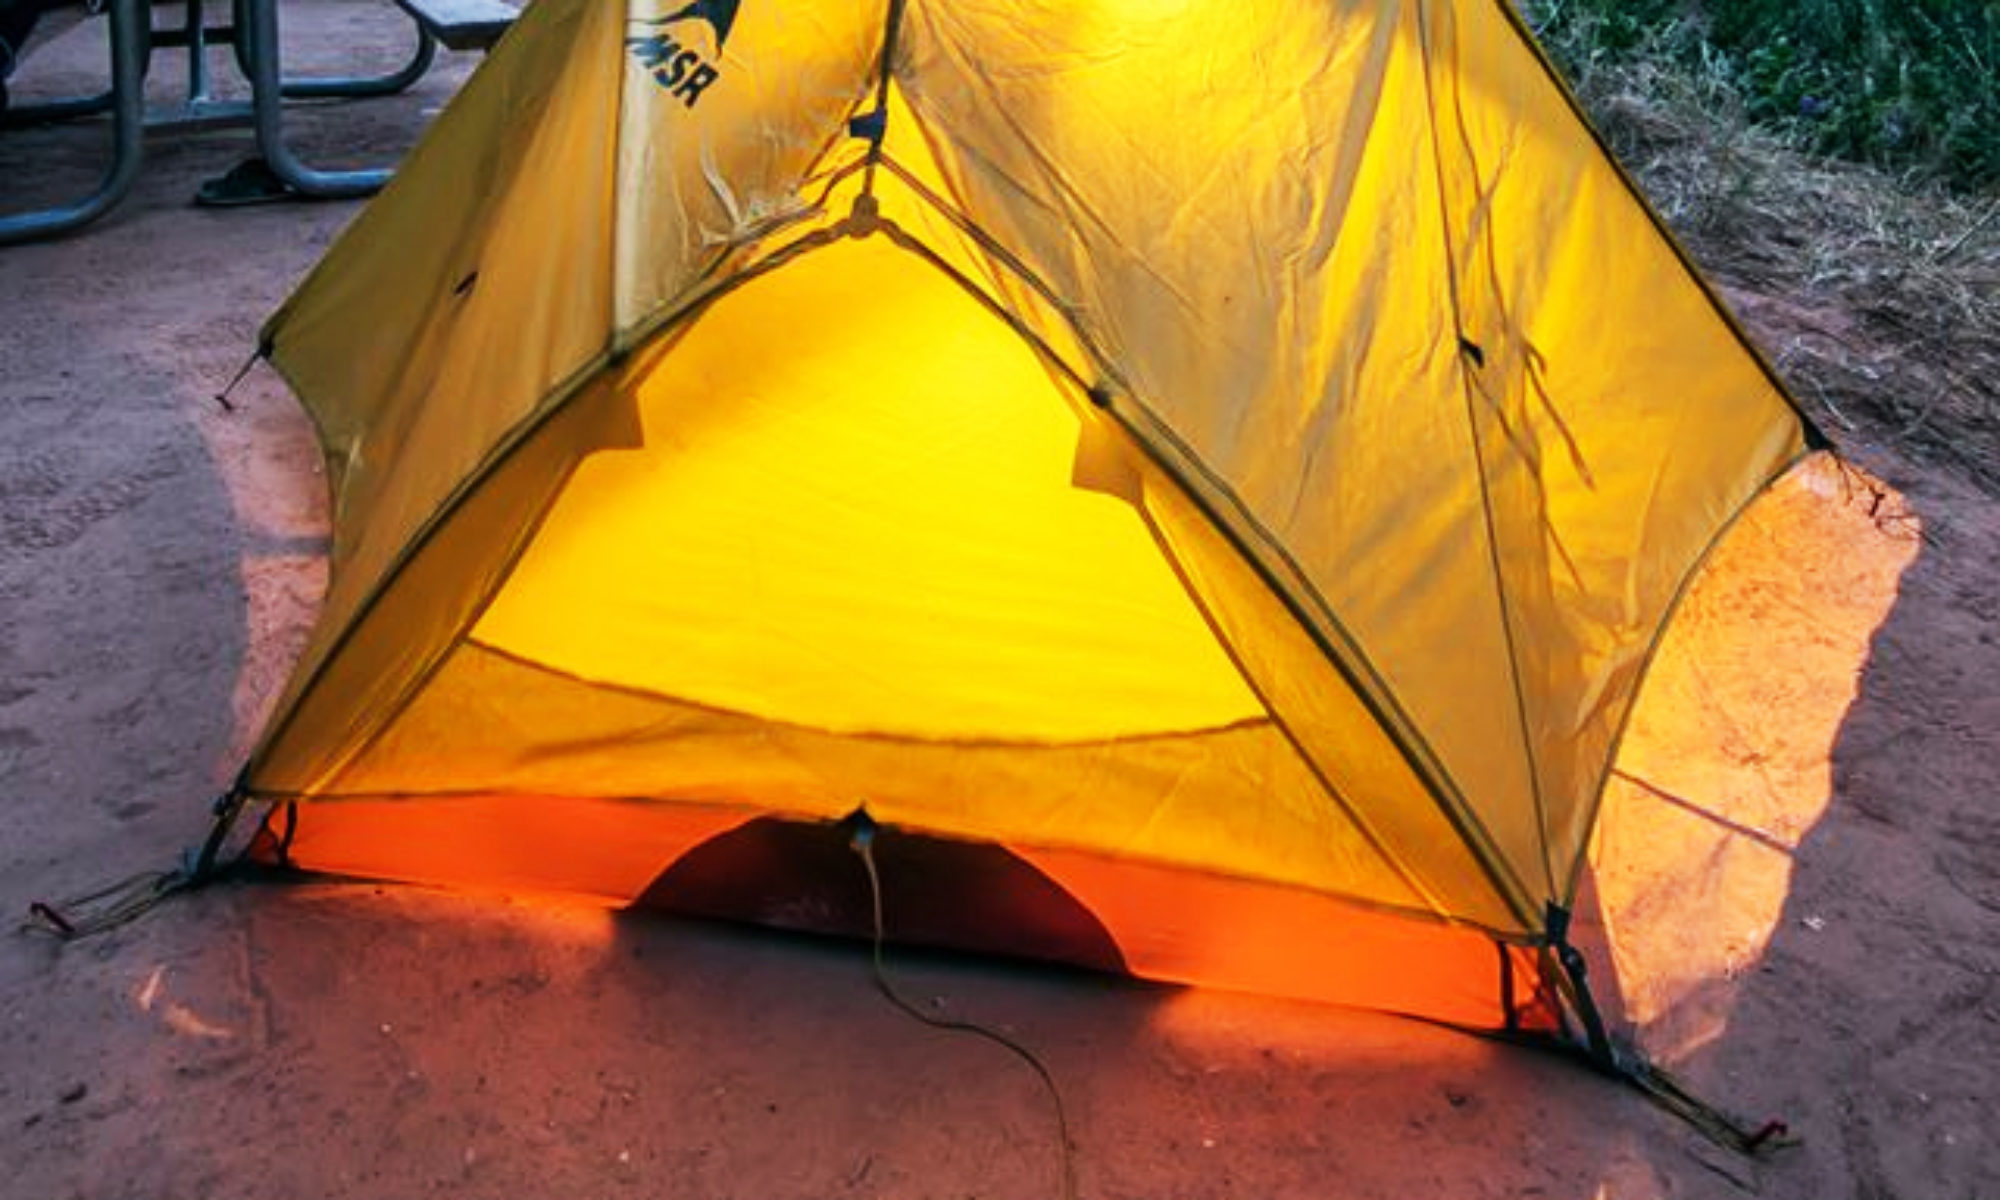
A sure sign of a rookie backpacker/tent camper is leaving food or smelly things like soap products, toothpaste , etc in their tent. Critters of all sorts will destroy your gear trying to get to it. The Havasu Falls area campground is well known for this problem.
If you make this error in bear country you most likely will have a lasting memory. A memory that might be terrifying? Or result in a total loss of food or gear. If you are in bear country you best have an approved container. Even then you better hang it well away from your tent and sleeping area, and practice a leave no trace campsite.
Many of these general precautions apply just about any place you backpack.
This includes packs and sleeping bags. Anything left on the ground or simply hung on a tree. Anything with a “Smell” no matter how well sealed or even unopened. It all needs to be removed from your gear when unattended or when your are sleeping. Then other prevent measures taken.
Although you may not be in bear country when visiting Havasu Falls. There are numerous critters at this specific location, that have had generations worth of training. All due to visitors not practicing food storage protection. A variety of critters are expert at chewing through gear.
A Ratsack or other food protection method is often a necessity. Just a good habit to always follow. There are a variety of critters lurking, waiting to snack on what you transport in. We have hit all seasons. From blistering summer heat, to bone chilling times of the year with snow. We have found all seasons have critters looking for easy food pickings. Namely your backpacked food.
While the squirrels are the most prevalent and most destructive. There are also ring tailed cats (similar to a raccoon), actual raccoons, skunks, mice, rats, roaming horses, coyotes, various undomesticated cat breeds, and even dogs. Other areas come with their own specific critters.
While all times of the year have their hazards, the warmer months see the highest activity.
You want to protect your tent, packs, and sleeping bags from damage. While in your campsite, keep all food and smelly items such as toothpaste, soap, cosmetics, lip balms, etc out of your tent, sleeping bags, and packs that are left unattended. Forget for even 5 minutes and it may be too late.
They will chew through tents (the rodents), drag your pack away (ring tails, racoons and canine breeds), and trash your tent (horses).
The first line of defense is to get your food and toiletries away from your expensive gear. Keep those items from leaving lingering smells on your gear too.
Our most successful method of prevention so far for the rodent type, is to purchase a Ratsack, Then stash/hang your “stuff”. Use a length of 100lb test mono-filament fishing line over a high tree branch. Hoist up the sack high enough. Keep in mind some larger animals will stand on their hind legs to reach up and try to snatch goodies. The horses even are adept on their hind legs. If it is hung close to the trunk or branch many of the small creatures can jump an incredible distance.
All of our items are first put in ziplock freezer bags. Even our “Pack it out Trash” is ziplock bagged and kept in your Ratsack too.
We ordered our “Ratsack”off Amazon. Only the large size was available at the time. When it arrived it looked overly large. It probably is too large for a single person. In hindsight I am glad that was the one we purchased. For two people it is very ample. We hadn’t thought through the trash issue until we were actually on the first trip with it. Then we were glad for the larger ratsack. We had plenty of room for both food and trash, times 2 people, for a 3 night backpacking trip. But it might be gross to some to mix good and trash together?
Bear proof containers are another option. Though Bears are not a worry in this Havasu Falls area. If you have such a container, and don’t mind the additional weight, they are doable. I would opt for the Ratsack in lieu of the Bear proof container in areas that I can do that. I have both to pick from. Its all about weight, and the critters you might run up against.
Keeping with Leave No Trace. Whatever you bring to hang your food. Containers, string, rope, or what have you. Be sure to take it down and pack it out when you hike out. Don’t leave any of it behind for the “next person”. You may want a second Ratsack to contain your opened product wrappers, leftovers, and waste you need to pack out?
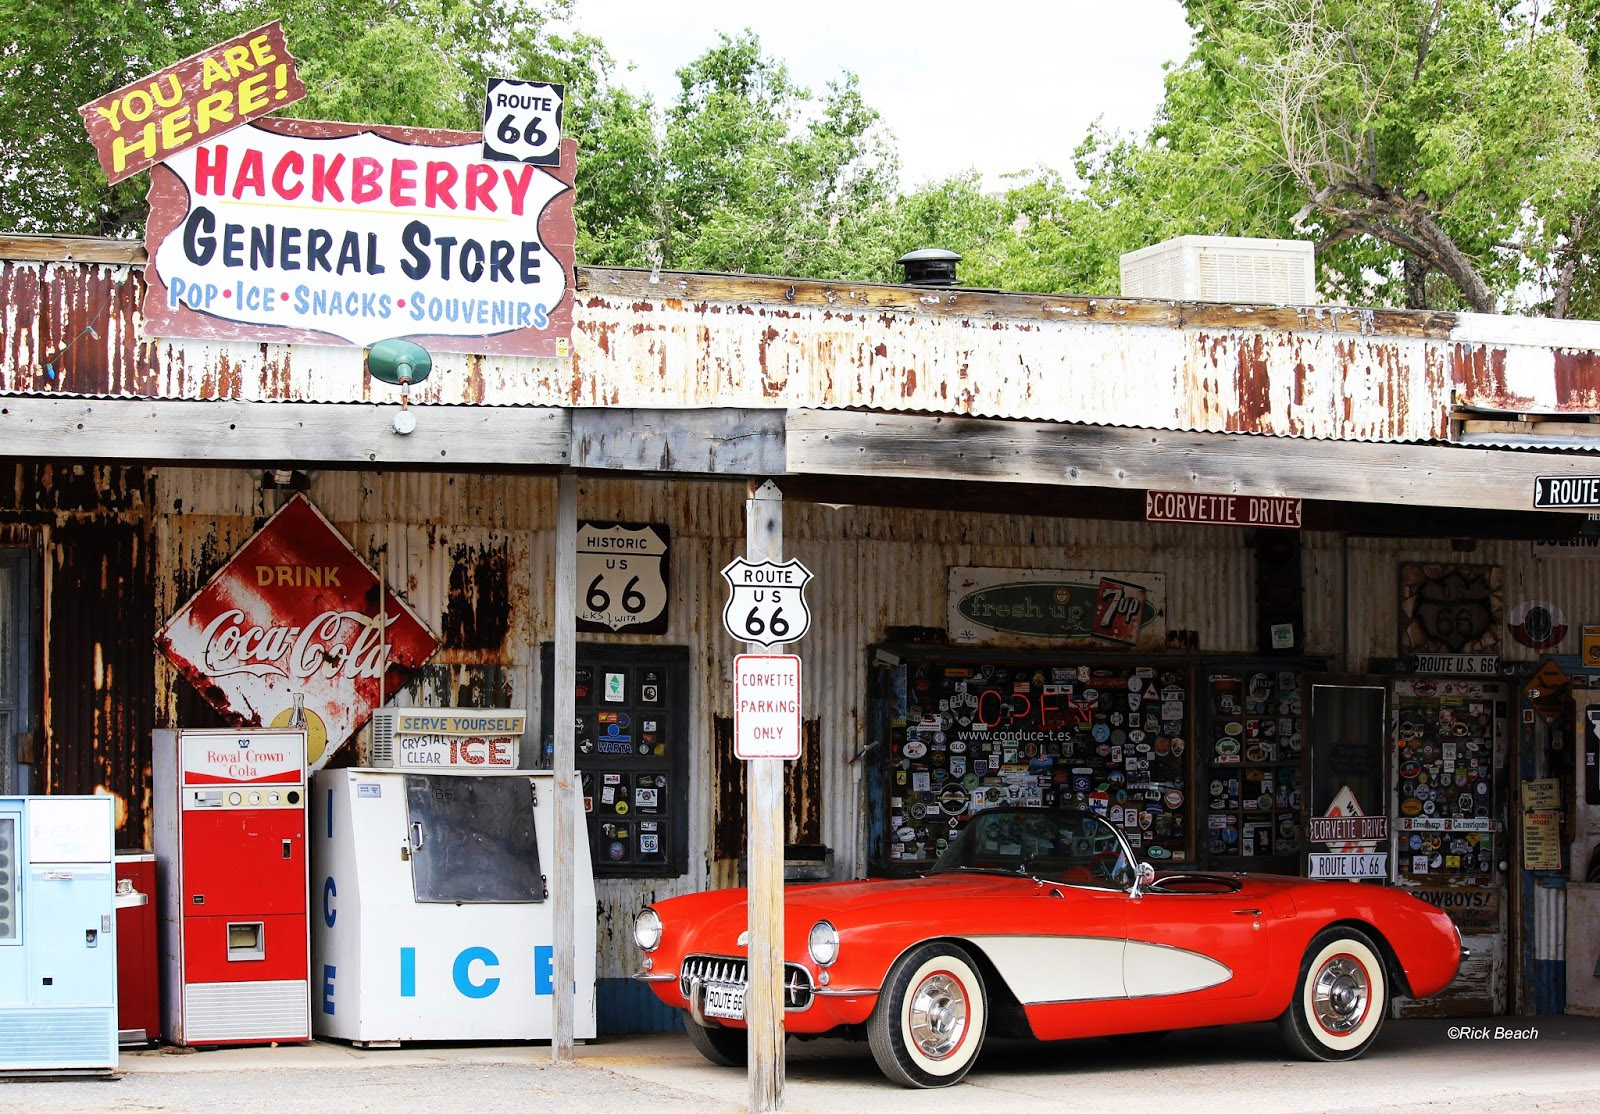
Today I stumbled into information related to the Hackberry General Store along Old Route 66, and an artist named Willem Bor. The route is often referred to as the “Mother Road”. The artist, fascinated by the route and old structures, set off to recreate them in model form.
If you are making a road trip on Old RT 66 between Kingman, AZ and Peach Springs, AZ you will pass right by the Hackberry General Store. Be sure to factor in some time to make a stop.
The artist info linked further in this article becomes so much more if you stop, get out, and explore the Hackberry General Store area.
Have you ever gotten to a page on the internet you have no idea how it happened? Suddenly into some obscure website that piques your interest? Subject related to something you would have never thought to go searching for it? Ah, the pleasures of modern technology. It allows you to travel the world in micro-seconds.
I have driven old sections of Route 66 over the years. I know I have been on numerous parts of it across the U.S. Chopped up pieces. Parts now off the beaten path of the much faster Interstate Highways. Though at this stage most of my recollection is isolated to some Arizona sections. Many small towns are locked in time. Seeming to stand unchanged since the time the Interstates bypassed once vibrant travel stops.
On the the subject I really wish to share. I stumbled into a blog of an artist (Willem Bor). His blog was created to show his craft of model making. Oddly he did not live in USA. But fell in love with the buildings along Old Route 66 during a visit. Many which are disappearing with time and decay. Willem Bor set off to recreate them in miniature form. In detail you may find hard to believe.
One building in particular is currently still standing and called “Hackberry’s General Store”. I have actually been there on numerous occasions, and have done my own photography.
Check out his blog link below. You can find the Hackberry General Store built in model size. Compare it to our photos on this page. Visit it in person should you have the opportunity. Then you judge how cool these model buildings are. I also love the history that is provided with each piece.
Sadly, in researching and going to his Facebook page I believe he is no longer with us since January 2017? His work and website lives on, at least for now. We can only hope he is traveling along Route 66 and comparing his work.
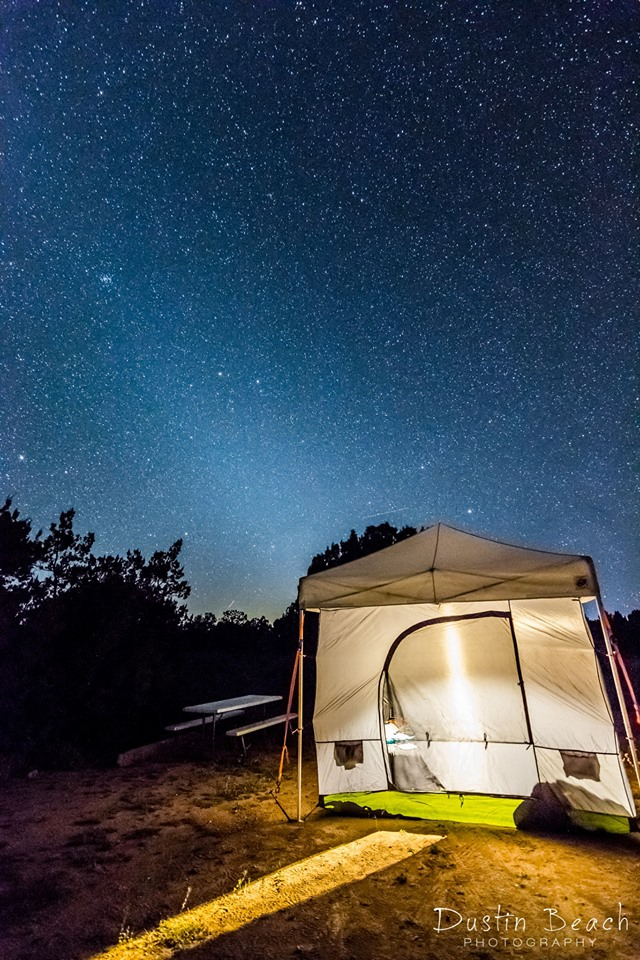
For those of you venturing on Old Rt 66 near Peach Springs, or Seligman, Arizona. Grand Canyon Cavern Campgrounds offers an excellent place to camp.
Late night Milky Way Photo Op at Grand Canyon Cavern Campground
The entrance is a few miles east of the RT 66 & IR 18 intersection. The view from the road side appears as an old run down gas station, and a small cafe. Some old vehicles staged around the parking lot up by the buildings.
We stopped in the cafe and the friendly staff pointed us to the road/drive, that snaked around the back of the cafe, and up over a small hill. We almost got nailed by the cops tucked in behind a tree (Vintage black & white cop car staged along the road) LOL!
The campground is about a mile on this paved road that winds through low growing evergreen trees. You eventually come to the restaurant first. This is some distance off the main road RT 66 and not visible from the main road.
Don’t expect RV resort accommodations. Though they do have power pedestals on many sites. The campground is typical high desert and appears not well kept. Sites are dirt. Some have picnic tables, some do not. No sites have any type of shade structure.
The Evergreen tree’s peppered about average about 15ft tall. This is high desert. So I suspect these are Cedars or Pinon Pine. They offer relatively little shade except in the late afternoon. They do provide a little privacy from some neighboring sites.
There are rough graded roads and ample sites tucked into out of the way places if you want to enjoy some privacy. We saw no site numbers. Once you pay you simply have squatters rights to any open place you want to make your camp.
Bathrooms/Showers…..not the best. But the shower water is hot. They are centrally located at the front of the camping area, and not too far from the restaurant building.
We made reservations at the last minute, the night before. Mid May there were plenty of sites. The grounds are large enough I would think you would not have trouble at any time? You might not get a level site, or one with power, but I think they would be able to accommodate you?
The prices (2017) of $32 a night for 2 with a tent was rather pricey we thought. I don’t remember if that included power or not. We did find a picnic table that had a power pedestal next to it. In hindsight a small electric heater and an extension cord would have been nice. It got real cold that night.
We had a picnic table and lots of 15ft Pinyon Pine or Ceders that offered wind breaks and some privacy. The campground location makes it near ideal for starting the trip the next day.
We didn’t have time to check out the Cavern tours. The Caverns are the actual reason this place exists! That might be another story for another day.
We arrived around 6pm and took advantage of the restaurant that looks like it is open until 8pm. Two of us can recommend the Pulled Pork/BBQ sandwich. We washed those down with several ice cold brews and had a very relaxing visit.
We tried to set up minimal gear to head out the next morning right at first light. It was a very cold night for sure. I believe more so because of the higher altitude. We survived the cold, and packed up gear the following morning at 4am to take off. Several other backpacking types must have had the same idea. Two other groups took off right before us.
So our recommendation is to allot the time to make this your stop. Enjoy the restaurant. Even arrive early enough to check out the Caverns.
Summer time may be different, due to heat. Camping could become unpleasant? Be sure to check this all out in advance of any trip through the area.
Seligman Arizona was once the part of the homeland of the Native American Havasupai people. The Havasupai at one time had a settlement in this very area.
In more current times Seligman is on the original Route 66. In recent years Interstate 40 bypassed the town a few miles away. Traffic for the most part no longer passes through town.
The town still vies for tourist dollars to exist. Now a small town of about 500 people. If you stop and take some time, photo ops abound in every direction. Old vehicles, Elvis, Burger joints, Frozen Custard, Road Kill Cafe, Gas stations, and a KOA Campground on the east end of town.
If you are traveling via old route 66 from the east, on your way to Peach Springs, you will pass through Seligman. You can also continue traveling west through Peach Springs and eventually hit Kingman Arizona. All on a section of old RT 66.
West of Peach Springs you will pass by the Hackberry General Store. Talk about another photo op. Be sure to stop!
This collective of Footwear recommendations is by numerous experienced backpackers that have provided input. Backpacking not only this area, but backpacking in general, anywhere.
We will discuss Footwear, Socks, Toenails, and Water Shoes. Especially for this trip, this terrain, and for safety reasons that many choose to ignore.
Many ignore functionality for the sake of looking ‘cool’ or “rad’, or whatever your generational lingo might be.
If you have something that needs added please email us with your thoughts.
IT’S ALL ABOUT THE FOOTWEAR
The type of boot or footwear you hit this trail with, will probably be your most important decision concerning gear.
Many people attempting a trip may have never done long distant hiking, let alone Backpacking under a load. Also not in such terrain.
Hiking and backpacking are two different worlds. We aren’t providing info for those that wimp out and have their gear transported by animal or vehicle.. Or for those that have their gear transported due to some special need due to medical or physical issues.
This info is for those that will truly be strapping all their gear on their back and hoofing it down the trail.
Many have hauled their own gear while backpacking. Then decide, there is no way they are carrying it back out.
The terrain and climate on any trip can be a challenge to many even without a pack. Add to these facts, the majority of people tend to carry a pack that is way over weight. Especially first timers. Many people are also not in peak physical condition.
There are many brands of footwear out there. It all boils down to personal choice, fit, and what you can afford. This is one item that really falls in the category of “You get what you pay for”. Don’t go cheap (Cheap in terms of poor quality) just because you think you will only use them for this one trip.
Don’t be swayed by recommendations that just don’t make sense for the terrain, pack weight, distance, weather (cold/wet) etc.
There is a reason Military personnel worldwide wear boots. The type that protects the ankles, provides sole protection, and arch support….. to repeat some of the reasoning. Not tennis shoes, or trail runners, etc.
Wearing proper, properly fitted,and properly broke in footwear will prevent a multitude of foot and ankle pain, and injuries.
Properly fitted also means making allowances for feet swelling or spreading, when hiking long distances, or under backpacks loads.
Breaking your footwear in is a must!
You won’t need many of the foot blister products that people recommend to make up for not heeding this simple step.
The majority of new people will unfortunately not listen to this advice, then end up learning some hard and painful lessons. But experience is a wonderful teacher.
Substantial soles are recommended to protect the bottom of your foot. A thousand steps on poor soles is like beating your feet over many hours. Walking on stones especially under load, with inadequate soles can cause long term pain that can last well beyond your trip.
Over the ankle footwear is better when used while backpacking under load or used to walk in rough terrain. It provides added support to prevent sprains. It is also highly recommended when cold and rainy.
The terrain can often cause you to misstep and twist or sprain an ankle.
Wearing low cut shoes can raise the chance of injury. Going down with a pack strapped on can cause broken arms, fingers, wrists, and the list goes on.
When backpacking under a load your foot tends to spread out and swell to some degree. Many of us have found boot styles that compensate for this. I personally recommend Keen’s brand after trying many brands over the years. They provide ample toe room .
When being fitted you want to take the socks you will hike with. Have the boots professionally fitted. Don’t just grab a pair of cheap boots off a discount rack, in your size, and head out the door for home…or worst out on the trail. They also need broke in!
Higher boots are recommended during the cold weather months. Especially when there is a chance of rain. Waterproof even better.
This brings up the point of using waterproof over the ankle boots when it is wet and cold. We are talking temperatures in the teens through the upper thirty degree Fahrenheit temps. You may even want to consider “Gaiters” and rain pants over those, to prevent rain or splashed water from running into the tops of your footwear.
You won’t stand a chance with low cut footwear in the wet and cold. If you can tolerate wet feet at 30°F or lower, then go for it.
Closed toe footwear is highly recommended.Seasoned backpackers consider it a “must”. There will always be those that will brag they backpacked in sandals, flip-flops, or tennis shoes. That they find them comfortable and the way to go. If you are new to this, don’t gravitate to this mentality. Rest assured, there are many testimonials of people having extreme pain and long lasting injuries. Inadequate types of footwear can be hazardous backpacking or even hiking.
Blisters seem to be the biggest problem.
Some that become incapacitated can ruin a trip for an entire group. A group of friends that may have spent months if not years waiting and planning for a trip. This is no longer an inexpensive trip either. Fee’s have been jumping each year.
Many ignore the recommendation of bottom soles rated for backpacking. Or ankle support to avoid twisting an ankle.
Some people will blow off experienced people recommending shoes/boots rugged enough, and made specifically for backpacking.
Proper footwear may also prevent knee and back injuries, or the unfortunate accident of going down with the weight of your pack on you. As said earlier, such a fall can result in finger, wrist, arm fractures, and damaged knees.
We even have a story from an acquaintance that went down. Hard enough to result in a broken nose.
Full protection footwear with socks is recommended. Both for protection from sharp objects, and to prevent sand and small stones rubbing your skin.
Open toes shoes are famous for getting a person stuck in the toe by thorns, cactus needles, pine needles, twigs, or some other pointed object.
It’s an invitation to peel off a toenail. Or worse, catch a toe and break it.
With punctures you would have to be concerned with tetanus or other types of infection. Or run something sharp up under your toenail. The coyotes will come running to your howling!
This is the same reason seasoned deck hands on boats wear closed toe footwear. They have the learned knowledge concerning similar hazards such as catching a toe on a deck cleat or other hardware.
Open footwear has a tendency to load up with sand or sharp small pebbles. All of which act like sandpaper on your tender feet.
There are endless rookies out there that have been lucky. People that pay no heed, and haven’t had an accident happen yet. They suggest or even brag they backpacked in sandals or other inadequate footwear.
This is the same mentality as not wearing a seat belt in a car because of never having a crash yet. People wouldn’t have accidents if they could see what the next few minutes of life had approaching.
You are pretty much on your own in a remote area. Leaving pain and suffering out of the equation, it is real inconvenient and expensive to seek any type of emergency medical attention.
Should you be injured, you will more than likely have to do considerable hiking with serious pain.
Helicopter medi-vac….I can’t even image what that would cost someone. We have heard $20K to $40K….and that is on your dime.
Don’t be that rookie that ends up suffering to save a few dollars, believing what some say of hiking with the lesser.
Or not heeding those with the life long experience that have contributed to this collective of recommendations.
If you aren’t concerned about yourself, at least be concerned about wrecking the trip for others that may be traveling with you.
ENJOY YOUR TRIP – SUMMARIZING
I am sure you will pass some ill prepared people that are doing a hike in everything from tennis shoes to flip-flops. I have seen them limping too.
Backpack smart, enjoy the trip, and don’t ruin it for someone else that is traveling with you. It is too hard to get permits into this area. You want a trip you can brag about. Not one you complain about.
Break the boots in long before you ever do long distance hikes or backpacking. Try them out soon after purchase. Wear them around the house, to go shopping, etc. If they don’t feel right take them back while you still can.
Eventually work up to walking several miles in your boots. Then start hauling around some weight in a backpack to prep for your actual hike. Somewhere in your planning and prepping stage you need to be doing several conditioning hikes that are the equivalent of your longest day backpacking leg.
Don’t do a trip cold turkey with no conditioning. Again some macho types will have you believing going cold turkey is possible with no pain. When you wake up the next morning after your hike with a backpack, you will know what some of us are talking about. Hiking/Backpacking down, and uphill works muscles you don’t normally work when traveling on flat terrain.
Include some inclines or stair steps in your conditioning.
The secondary benefit of breaking in your footwear, and conditioning with weight, distance, and incline, is the fact you will be toughing up the skin on your feet. This especially benefits people not accustomed to long distance backpacking. We aren’t talking about building up any super layer of callus. But those that put in miles constantly, have definitely built up hardened skin that provides a huge protection factor. These people fair much better than those with soft feet.
Submitted by: Slim Woodruff 2/24/2017. A “Leave No Trace” Trainer
Havasupai has been called a paradise, and deservedly so. Havasupai is a favorite destination for the first time hiker. However some of these new time campers, and admittedly many of the old ones, do not seem to understand the idea of “Leave no Trace”.
Leave no Trace is a system of ethics regarding the use and protection of public lands. It is a system of ethics, because often one may follow rules only when there is a possibility of getting caught. Ethics are what one does when no one is watching. There are a list of principles of “Leave No Trace”.
Plan ahead and prepare.
Make sure of the regulations before starting down. Don’t go without a permit. Day hikes are not allowed. Alcohol and illegal drugs are prohibited, and use of same is disrespectful. Yes, there are those who indulge and they usually get away with it. However when visiting a friend’s home, one respects the wishes of said friend. The Havasupai do not allow alcohol. The same goes for cliff diving, drones, and professional photography.
Travel and Camp on Durable surfaces
Stay on the trail. Admittedly, most of the trail is in a wash, but in those last, long, sunny switchbacks, do not take shortcuts between said switchbacks.
If visiting certain waterfalls, be aware that the newly-cut creek bed is unstable in places. Respect those signs which tell you to stay back from the edge. Climbing cliffs and rocks is prohibited. Hiking anywhere but the one established trail is prohibited. This is the home of the Havasupai people, and they don’t want trespassing.
Dispose of waste properly.
Simply put, this means carry it out. If you can carry it in full, you can carry it out empty. Do not toss your trash by the trail. Do not leave it in the campground. There are those who decry the use of pack horses to carry gear. How do you think trash which is left there gets out? On these same pack horses. Trash containers in the outhouses are for feminine hygiene products, not your camping trash.
If some of your equipment breaks or tears, carry it out. If clothing or shoes get too dirty to ever use again, carry them out. The only exception is leftover stove fuel. It is permissible to ask the rangers if they can use this. But ask first.
Soap does not go in the water, period. Not biodegradable, not hemp soap, not natural, hand-crafted by Buddhist monks soap. Biodegradable soap is designed to be dumped on the ground, not in the water. Would you like to drink water with soap in it? Soap affects not only fish and other aquatic wildlife, but the microbiological systems in the water.
Leftover food must be carried out. Animals will eat it, yes, but that trains them to become dependent on humans and thus become pests. Buried food will be dug up.
Use the outhouses provided.
Yes, sometimes it is a long walk, particularly after dark. Yes, sometimes there is a line. But if people do not use the outhouse, the campground will start to smell like a cat box.
Hanging food from trees is a good idea.
But take down the ropes when finished. I collect several yards of cord and rope every time I am down there. This could be a hazard to birds or to climbing animals.
Leave what you find.
No collecting rocks, flowers, or any artifacts. You may, however, pick up as much trash as you wish.
Minimize campfire impact.
This one is simple: no campfires are allowed. Yes, you may see fires, but they are illegal, rude, and inconsiderate. You will notice leftover fire rings and blackened ground from these illegal fires. These marks will last for decades.
Respect wildlife.
Do not feed the animals or leave leftover food. See above. If you bring a dog, keep it on a leash. Regarding Supai dogs, it is temping to feed them, but do you feed junk food to your own dogs?
Be Considerate of other visitors.
Not everyone wants to hear your boom box or your external speakers. Some hikers take to their bed sooner than you so as to get an early start on the trail hiking out. The campground is very crowded and close quarters. Keep the noise down.
Stay within the confines of your camp.
The campground is almost always full. If you have a smaller group, do not spread out over several tables. If someone camps right next to you, it is usually because there is no other place available. Play nicely and share.
Many seasoned backpackers carry an “In Case of an Emergency Card“. This might just be a review or reminder for many. To those new to the joys of walking off into the woods, or into a remote canyon, this may be a life saver.
Several things are stressed to those familiar with venturing off into remote area’s. In addition to leaving itineraries with loved ones. do the same with the local rangers. Check In and Check Out. Stick to your itinerary and time table. Check in at designated times. Always make date and time entries along with your full name, on trail logs or at trail check points, should such logs or check points exist.
#1 Leave your itinerary and contact info with a loved one. Provide them contact info for rangers, park personnel, etc. Have an arranged time that a call is made to notify that loved one, you have completed the trip, or a leg of a trip safely.
Stress that they call someone in authority if you fail to call in at your designated time. Or some form of acceptable delay variation. Then stick to your plan.
#2 Advise local Rangers. Provide your Itinerary and time table. Check in & Check out.
#3 Carry a “IN CASE OF EMERGENCY CARD” A card you carry on your person. Some phones have a app for this but I would not depend on an electronic device when backpacking or hiking.
There are bracelets available that can be engraved. Many First Responder’s look for medical bracelets. It might be advisable to engrave one with “See my “In Case of Emergency Card” in my wallet…..or something to that effect.
There are new bracelets that have a code engraved. The code gets called into an 800 number to retrieve details you keep updated. Bad idea in my judgement, for many of us. You have to depend on phone service with some of these options. So they may not be feasible for many “remote” Backpackers/Hikers.
Nothing works better than good old fashion paper.
Remember you may become unconscious due to an injury, some type of bite, or a medical episode. This can happen not only on the trail, but also while traveling in a vehicle, or just going about your normal day.
Medical personnel, Police, and other First Responder’s will need this info, and perhaps use precious time looking through your things in an attempt to care for you. Or they may inadvertently apply some normal first aid, that might be ineffective or hazardous to you.
So the advice is; Don’t leave home without it! You are a rookie if you do.
What do you need on the card?
I create a card using card stock grade paper, using my computer and printer. It is a front and back thing. As small of font as possible that is still legible. I make it slightly less in size than a credit card. When I am satisfied with the info I laminate both sides and allow a little of the laminate to extend past all edges of the paper. It is then trimmed to the size of a credit card. You can use the self sticking type of laminate on both sides. Or the heat type if you are fortunate to have a machine for that. If you have more info you think should be known you may have to create multiple cards.
In my case, I carry mine in my wallet, or with my ID. I carry it 24/7 even when I am not out in nature. I have to replace it from time to time. Check its condition and readability prior to each trip.
I have altered my card over the years. I once had a signed statement spelling out who was authorized to make legal, medical, and life support termination decision on my behalf should I become Incapacitated. That was before I was married.
Things to consider having on your card:
*Your Full Name
*Address
*Social Security Number
*Emergency Contact Telephone Numbers, the persons name, address, their relationship to you (The more the better in case someone doesn’t answer)
*Medical Insurance Info. Tel#. Policy #, Group #
*Medical Conditions Such as being diabetic, Seizures, Anemic, on blood thinners, etc.
Allergies to Medications/Food
*Perhaps what a First Responder needs to do if you are having a medical episode and can’t talk
*Medications you take, amounts, intervals
Other?
Pack Compares. No two packs are the same in comfort or in weight. Often times comfort is sacrificed to reduce weight.
In my experience, reducing weight is far more important, the longer your trek. Especially kicking through sandy trails, doing switchbacks at high altitude, trudging in the heat, stepping up endless rock stairways, or generally clicking away 10 miles or more a day.
I have backpacked many years, many miles, and with a wide selection of gear. In a pack I evaluate and rate based on several factors.
(1) Weight is my main factor. The dry weight must be in the 2lb range.
(2) Comfort is next
(3) The pack must have accommodations for a bladder. i.e. a compartment or pouch, and a slit in the pack to extend the bite valve and tubing through. Tube attachments on the straps are a plus.
(4) Pack must contain many external pockets. Preferably zippered compartments to prevent loss. Also enough external compartments that I can access most of my items without digging through the pack. If my tent, sleeping pad, and sleeping bag, can fit in the main compartment, and I can spread my other items to the external pockets, that is ideal. The type that incorporates a break-a-way day pack is beneficial.
(5) Must have a padded hip belt for distributing most of the load on the hips.
(6) Prefer padded shoulder straps and a quick-release breast strap.
(7) New on the market are swivel pack to waist belt. Reports of one on a 2017 came back very favorable on a 40+ lb pack weight.
As a comparison of the packs I morphed from and to. My original carbon fiber external frame pack, was extremely comfortable short term. (Which is very deceptive when trying on in a sporting goods store). I even had extra quick connect straps attached all over, to strap down my tent, bag, and pad. I used this system for a good decade.
But long term, and long miles, the extra weight of the dry pack takes its toll when factored into total pack weight. Simply changing choice of packs, and no other gear, shaved 6.5lbs off my total carry weight. I then went to a ultralight bag and tent. It was easy to drop 15 lbs. Expensive though.
Taking this approach to everything you stuff in your backpack. You will soon be rewarded with a pack of less that 25lbs verses 40 or 50 lbs. Believe me….after 10 or 12 miles of backpacking you will definitely notice the difference.
Those that have a knack for writing, and have true life experiences with other packs, we would like to hear from you. Send us something short and with some photos. Email to: info@toponautic.com
Beer or Soda can stoves are a great alternative to expensive high tech gear. One year, some members of our backpacking team, made a huge effort to go light, and go cheap. Several of us did DIY and built what is commonly referred to as a beer can stove. Cheap, easy, and surprisingly very usable.
They are virtually weightless if you are only talking about the stove. They burn denatured alcohol which you have to factor that weight in. Also the weight of a leak proof fuel container.
There are plans all over the internet. So we will not go into the details of construction. Build and use these stoves at your own risk. The flame from the alcohol is virtually invisible especially in bright sunlight. But they put out some incredible heat. Great for boiling water to prepare dehydrated meals.
Wind can make them a little difficult to light, and at times hard to maintain the flame. Carry some type of wind screen even if that might be folded up aluminum foil. Or stack some rocks or other natural wind screen.
Lighting is a bit tricky until you get the hang of it. There is a primer stage to get the fuel vaporizing….then things take off nicely. They light easily using survival type Fire Starter Sticks that incorporate magnesium rods and striking sticks. Sure beats being cold and hungry to find out your matches have gotten wet.
These stoves can also be used in an emergency situation in which you need to start a campfire with wet or damp wood.
Burn your unused fuel before you hike out, and you carry nearly no stove/fuel weight on your return trip.
Regardless of whether you end up using one, they are fun to make and try out.